Screenshots let you catch precisely what you’re seeing on your screen to impart to other people or reference later. Taking, sparing, and sharing screen captures can be incredibly useful. Truth be told, some demand that the screenshot is the most significant thing on the web.
Not exclusively do screenshots assist you with demonstrating your case, they additionally assist you with chronicling the past. For instance, they can enable you to catch what a site resembled before the most recent brand revive, that bizarre blunder message you got two or three months back, or even a delicious tattle article you would prefer not to hazard overlooking.
Different Methods to Take Screenshot on Dell
So, do you have a doubt about how you can take a screenshot on your dell laptop? There is nothing to get worried about. There are various ways you can take screenshots on your dell laptop. Let’s get to know them.
Method 1- Screenshot Using Snipping Tool
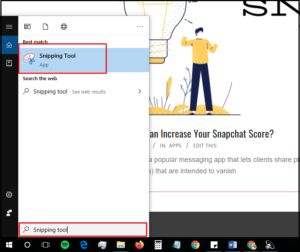
Step 1: Open the Start Menu on your laptop by pressing the windows key in the bottom left corner.
Step 2: In the search bar type Snipping Tool and you will see the tool option. The tool uses a sign of scissors as its icon.

Step 3: Click on the tool and open it.
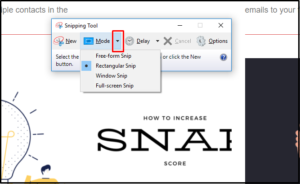
Step 4:Tap on the drop-down option and choose the shape as

- Free-form Snip – To take any shape of the screenshot.
- Rectangular Snip – This option is the default. By using this you will get a rectangular screenshot.
- Window Snip – You can take a screenshot of a specific window.
- Full-screen Snip – To capture the full screen.
Step 5: Change the color of the border if you want by clicking on the Ink Colour. The default color is red.
Step 6: Click on New. The tool will start working.
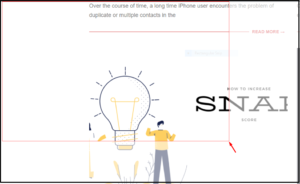
Step 7: You can drag the mouse on the screen wherever you want the screenshot. In case you select the full-screen mode, when you click on new, the tool will take the screenshot.

Step 8: After you are done, release the mouse button.
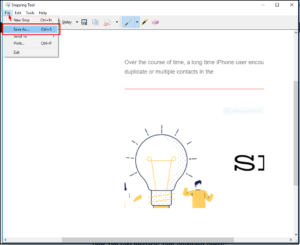
Step 9: Save the file wherever you want. The screenshot is done.

Method 2 – Screenshots Via Windows 8 & 10
Step 1: Open a page or a webpage where you want to take the screenshot.
Step 2: Press the PrtScr and Windows button simultaneously.
Step 3: Your screen will go black for a second which means a screenshot is done.
Step 4: Now go to Start Menu and search Typing Screenshots
Step 5: A folder will appear named screenshots. Open the folder and you will find all the screenshots that you have taken.
Method 3 – Screenshots Via Windows XP, Vista, and 7
Step 1: Open a page or a webpage where you want to take the screenshot.
Step 2: Press the PrtScr button. It will copy an image of your screen to the clipboard.
Step 3: Now, go to Start Menu and search for Paint application.
Step 4: Open the Paint application and paste the copied image.
Step 5: Now, save the file at the location that you like.
Step 6: The screenshot is saved successfully.
Method 4 – Screenshots Via Snagit
Step 1: Download Snagit. It’s a screen capturing software that lets you capture your screen the way you want.
Step 2: Install the software and sign in to it.
Step 3: Now, click Capture Button.
Step 4: Click and drag the mouse to select an area that’s your screenshot.
Step 5: To save the file you have to tap on the Camera icon shown there in the toolbar. You can also further edit the image.
Hope, you are familiar to all the method. Choose whichever you like or try anyone that works the best for you. By learning the method you might now get that taking screenshots is such a simple thing. Screenshots are very important and you must all the ways to get them. So, at least when you are unable to get the screenshot with your default method, you can have some alternative to do the same.
These methods are the best alternatives you can use and it will deliver the same results. In many cases when you take a screenshot, the screen dims and goes black for a few seconds. That means you have taken the screenshot. So keep it in your mind while using any of the methods.